HOW TO PREPARE WALLS FOR PAINTING
When it comes to ensuring that your paint project is a success, there is no more important place to start than room preparation, including cleaning, sanding and priming walls before painting. While not every surface will require multi-step preparation, we encourage you to thoroughly check surfaces prior to painting and take action where needed.
Cleaning Walls Before Painting
Clean walls are key in preparing a room for painting. While there is no best way to clean walls before painting, most walls can be washed using a sponge and warm water. For surfaces that have exposure to oil or grime, like kitchen walls, wash with a solution of water and grease-cutting detergent and follow up with clean water to remove any residual cleaning agent. Finish by wiping the walls with a damp cloth.
Removing Mildew
No matter which room you’re preparing to paint, make sure you address any mildew first. Never paint over mildew—it will grow through new paint, which will make subsequent cleaning and maintenance even more difficult.
Repair damaged areas:
Interior house painting means much more than cleaning a few walls and choosing a chic color. To get the results expected, you must find all the flaws before priming and painting your walls. Loose patches of old plaster and cracks around window and door frames are some of the most common problems you may observe when inspecting your walls. After removing the old plaster, prepare fresh plaster to repair those areas. As well, a good idea would be to fill the gaps around windows and doors with a flexible sealant.
Find “invisible” flaws: While some flaws are visible, others are not.
You can use a utility light to find the flaws that are less obvious. Hold the light close to the wall surface, moving it up and down. Circle any flaws you notice so that you can find and repair them later. After executing all the repairs, use sandpaper to smooth imperfections away.
Use lining paper:
Using lining paper implies additional work, and it usually doesn’t do much good. However, in specific situations, such as when walls have lots of fine cracks or large repair areas, covering them with lining paper can help you get a smooth, flawless base for paint.
Prime your walls:
If your walls are covered in a water-based paint, you can apply a fresh coat of paint over the old color. But if you intend to paint over a semi-gloss, gloss, or oil-based color, using a primer is imperative to end up with perfectly painted walls.
Use a special stain-blocking primer:
Although a regular primer can hide small imperfections, most products can’t cover certain marks, such as those left behind by water and permanent markers. These marks will bleed through your paint, even if you apply several coats. First, try to remove the stains; if they won’t go away, use a stain-blocking primer.
How to Prepare a Painting Kit
Before you begin a painting project, be prepared by putting together a “painting kit.”
- A typical painting kit includes patching paste, a putty knife, a drop cloth, plastic gloves, paint thinner, primer and a paint can opener. Note: Do not open a paint can with a flathead screwdriver, as this can damage the lid.
- Be sure to purchase plenty of painter’s masking tape, assorted paintbrushes and a paint roller and roller cover. It would also be helpful to add an extension bar to your kit. It will help you reach the ceiling and will allow you to stand away from the wall to prevent spatters of paint on your clothes.
- The paint kit should include a paint pot and a roller tray with a disposable liner. If you plan to paint a large area, include a 5-gallon bucket with a screen grid for removing excess paint from the roller.
- No paint kit would be complete without a multipurpose paint tool, which can be used to clean caulk, pull nails, clean roller covers, apply putty or glaze, scrape paint and drive nails. Finally, be sure the kit includes safety glasses to prevent paint spatters from getting in your eyes.
- When selecting paintbrushes, choose nylon- or synthetic-bristle brushes for use with latex paint and natural-bristle brushes for oil-based paints, stains and varnishes. Paint-roller covers come in different naps and textures. Unless you plan to apply texture to the wall, use shorter naps for smooth surfaces and longer naps for textured surfaces.
- Instead of dipping the paintbrush directly into the paint can, use a paint pot, which is wider than a standard paint can. When loading the brush, dip half the length of its bristles into the paint. Slap the brush against the side of the pot to remove excess paint, and remove the brush. Hold the brush up at an angle to hold the paint. As you apply the paint to the wall, the friction will draw paint from the brush.
- Drill holes in the paint stick to help mix paint more thoroughly. To keep paint from drying in a half-empty can, fill any air space by dropping old golf balls into the can. A common problem known as “hatbanding” occurs when painters use a paintbrush for cutting in and a roller to apply the rest of the paint, thus producing a different texture along the ceiling and trim. To prevent hatbanding, roll the paint as close to the cut-in areas as possible.
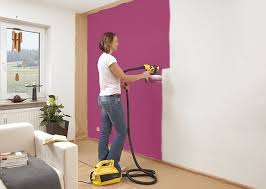
DO PROFESSIONAL PAINTERS USE SPRAYERS?
It’s no secret that professional painters want to get their work done as quickly as possible, but without sacrificing the results. Often, a paint sprayer is a great way to do this. It just depends on the dynamics of a particular room or structure. If the room can be protected in such a way that no overspray will get on any surfaces, then a paint sprayer is a great option. This is often the case in new construction or if a house has been emptied for the painting. Also, exterior painting is often a great time to use a sprayer, since there are fewer concerns with overspray, and the surrounding areas can be more easily protected.
A paint sprayer is a good option for professionals, since it can apply paint to a large area more quickly. It also gives a beautiful, even coat. It isn’t always a great choice for do-it-yourselfers, however. First, the equipment can be too expensive for those who don’t use it every day like we do. Second, it takes skill and practice to get good at using it
Primer Tips
You don’t have to prime the entire wall when painting over previously painted wood paneling, but you should spot-prime with shellac-based primer to cover tannin stains or smoke damage. If you’re sensitive to VOCs and prefer a water-based product, check the label; some latex primers are formulated to block stains as well as shellac-based primers. Most primers contain white pigments, and if you’re painting your walls a dark color, it pays to tint the primer — that can make the difference between two and three topcoats. Ask the sales clerk to do this for you when you buy the primer.