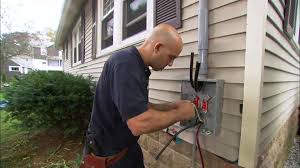
Electrical Panel or Load Center
An electrical panel is also called a load center. It is a metal electrical service box that accepts the main power to the home and distributes electrical current to the various circuits within the home. The distribution of power to the various circuits are protected from over-current by the use of circuit breakers or fuses.
Once you open the door to the panel you can access all the circuit breakers or fuses. Usually one of these panels feeds all the circuits in the home but there may be a situation where there is another “sub-panel” serving a dedicated area like a new kitchen.
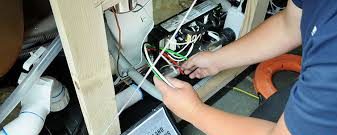
How to Wire a Residential Load Center
A residential load center is composed of a series of center panels or breaker boxes, each of which carries around 200 amps. You can learn how to wire your own residential load center with these simple steps. Be sure to take all necessary safety measures to protect yourself from accidents while performing this procedure. Below are the materials that you need along with the instructions on how to wire a residential load center.
Step 1-Turn Off the Power
The first thing you will need to do is switch off the main power source of your home. Locate the main circuit breaker of your house and turn off all of the circuit breakers to make sure that there is no power running in your house while you are installing the load center. For added security, wear a pair of insulated gloves and see to it that the surface that you are standing on is not wet.
Step 2-Connect Cables to Top of Box
Connect the power cables used for incoming power to the top of the box if they are not yet connected to this location. Using a screwdriver, make sure to tighten the power cable clamp so that they are securely in place.
Step 3-Strip Wires
Strip the sheath of the cable wires down to about one inch. Use your utility knife to strip the sheath off the wire. Strip the wire such that you can see the bare metal inside the wire.
Step 4-Place Striped Wires in Terminal Blocks
Place the wires striped with black and red into the terminal blocks. The blocks can be located on the two main bus bars found at the top middle portion of your panel on top of each of the bus bars. Using a torque wrench, tighten the lugs found on the blocks. Consult your local code to determine how many pounds of blocks to use. Usually, you should use around 200 to 250 pounds for this.
Step 5-Place White Striped Wire in Terminal Block
Take the white-striped wire inside the terminal block found on the neutral bur bar. This can be found to the side of the main bus bars. Use a torque wrench to tighten the lug again. Make sure the lug is fully secure.
Step 6-Place Ground Wire on Neutral Bus Bar
Place the ground wire inside a block located on the neutral bus bar. Use a screwdriver to tighten the screw. Consult your local code again to see if you will need to install a ground bus bar. If so, you will need to purchase a separate ground bus bar and install it separately as well. If you look at the unit, you might see a space allocated for this. The ground bus bar panel should be placed in this area. Simply screw it in place before utilizing it.
Step 7-Turn On Power
You can now turn the power back on from your house’s main power source.
Common Electrical Problems in Service Panels
Regardless of whether you own your home or rent, being able to recognize problems with your electrical panel is an important skill. You should never attempt to repair or troubleshoot electrical problems yourself (beyond resetting a breaker or replacing a fuse) because the potential for death or serious injury is high.
Here are the most common electrical panel problems you might encounter:
- Overcrowding
If your home is new or has been extensively remodeled within the last ten years or so, it is probably equipped with a 200-amp electrical panel. A 200-amp panel is large enough to accommodate the power needs of the average family home.
Smaller homes and those built prior to the 1990s likely have a 100-amp service panel. Depending on your individual power use, this might be sufficient, but for the average family, 100 amps simply isn’t enough.
Electrical panels that provide only 100 amps of power are at the highest risk of overcrowding. Not sure what an overcrowded panel looks like? Check for these signs:
- The panel looks messy. There are no blank spots for additional circuits to be added in the future, and wires are crossed and tangled rather than neatly fastened inside the panel.
- You spot double-tapped breakers. With a couple of exceptions, circuit breakers should have one wire connected to them. Two wires connected to the same breaker create a double-tapped breaker (and a code violation). These wire connections are more likely to loosen over time, which can cause electrical arcs and fires.
- Insufficient capacity
Electrical panels are rated to handle a discrete amount of electricity. When the panel is too small for the house and the power requirements of its inhabitants, you’ll start to notice problems such as power surges and flickering lights.
Here are some additional signs of a too-small panel:
- The panel and/or the surrounding wall is warm to the touch. Overloaded wires and circuits put out quite a bit of energy in the form of heat, so a warm or hot panel is an indicator that the power load on the panel is too great.
- Circuit breakers trip often. A circuit breaker that trips every once in a while usually isn’t cause for serious concern. When the same breaker trips on a regular basis, however, or the breaker trips immediately after being reset, call an electrician.
- Corrosion
Electricity and water don’t mix, so have an electrician investigate any signs of rust, water damage, or other forms of corrosion (such as discoloration) in the main service panel.

What is the difference between a loadcenter and panelboard?
There is no difference as far as UL and the NEC are concerned. Eaton offers “loadcenters” as we call them which are panelboards that are targeted to the residential markets and are consider a lower cost version of a panelboard for that market. Typically the loadcenter has plug in type breakers that are required compared to panelboards that allow for bolt on breakers… A panelboard is typically used in a commercial or industrial application. Panelboards have a can, interior and trim. The can is installed at rough in and the interior later. Loadcenters are limited to 240V or less and max at 400A. all these consideration come into play and unless the specs have specific requirements that define the panelboard further, A loadcenter or panelboard as we define it can be offer if it meets the application and spec.
Ground Fault
A particular type of short circuit, a “ground-fault,” occurs if a hot wire comes in contact with a ground wire or a metal wall box or touches wood framing members. Ground faults can be especially dangerous when they occur in areas with high levels of moisture, such as kitchens or bathrooms, or in outdoor locations. A ground fault carries a definite risk of shock.
There are steps you can take to identify and fix a ground fault, but also essential steps you should take to prevent one from occurring in the first place. For example, in areas where direct contact with the ground or water is possible, building codes may require that outlets be protected with GFCIs (ground-fault circuit interrupters).
As with hard shorts, a ground fault causes an instant reduction in resistance and an immediate increase in electrical flow. This causes the internal mechanism of the circuit breaker to heat up and trip. As with hard shorts, if a ground fault is present, the circuit breaker may trip again immediately after you reset it.