How to Install a Toilet on Hardwood Floor
Hardwood flooring doesn’t create many problems when it comes to installing a toilet. In fact, it’s easier to install a toilet on a wood floor than it is to install one on ceramic tiles, which is a more common bathroom floor covering. You’ll encounter fewer problems if the flooring is already down when you install the toilet floor plate, more commonly known as the flange, but it’s no biggie if it isn’t. One thing is for sure, though. The toilet itself cannot be in place when you lay the flooring.
Rough-In Plumbing for a Toilet on a Wood Floor
If you’re putting a toilet in a place where there hasn’t been one before, you need to install the waste, vent and water-supply pipes. The water pipe goes in the wall and isn’t affected by the floor covering. You’ll need to cut a 4-inch hole in the floor for the waste pipe, though, and its center should be at least 12 inches from the back wall and walls on either side of the toilet. Cut this hole with a reciprocating saw after drilling a pilot hole to get the saw started.
After cutting the hole, you then install the flange. It consists of a plastic or metal ring to which you can attach the toilet and a 4-inch nipple to which you can attach the waste pipe. Most plumbers use #10 Phillips screws to attach the flange to the floor. After gluing the waste pipe to the flange nipple, running the pipe to the sewer and teeing in a vent pipe that ties into the main vent stack, you’re ready to install the toilet.
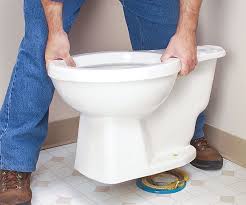
Install a Toilet on a Wood Floor
If the flooring is already in place when you install the toilet, the flange will sit on top of it. When you install the toilet wax ring on the hardwood floor, you may find that the flange raises the toilet a small amount above the floor. This will cause it to rock, and the wax seal can break, resulting in a leak whenever you flush.
To avoid this, shim up the toilet using either plastic toilet shims – available at any hardware store – or a toilet base slab with the same shape as the base of the toilet. One you’ve secured the toilet to the flange by tightening the two toilet bolts, protect the wood floor with caulk. Clear or colored silicone caulk are both suitable to caulk the toilet to the floor.
The Flange Is Already In Place When You Lay Flooring
You may encounter a situation in which the toilet flange has already been installed on the subfloor, and you’re laying new flooring. In that case, you cut the flooring boards to fit around the flange, leaving about an inch clearance in all directions. This recesses the flange, and it can create the opposite problem, depending on the wood thickness: The wax ring may not reach the bottom of the toilet when you mount it.
The most secure solution is to increase the thickness of the flange with a flange extender. This is a plastic or metal ring that fits on the top of the flange and is held in place by the screws that hold the flange to the floor.
Flange extenders come in various thicknesses, so choose the thickness you need after measuring the distance between the top of the flange and the surface of the floor. A properly sized extender raises the flange height to within 1/16 inch of the floor surface. Mount the toilet on the extended flange, apply wood floor caulk around the toilet base and you’re done fixing the toilet to the wooden floor.
Why Toilets Leak at the Base
If you notice water pooling around the base of your toilet, there are several possible causes:
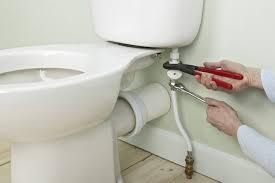
- The bolts that secure the base of the toilet to the floor might be loose. The base of a toilet is held to the floor with two tee-bolts threaded up from the mounting ring through holes in the base of the toilet. If these bolts are loose, the toilet may rock, breaking the seal formed by the wax ring. If this is the case, each time the toilet flushes, drain water may seep out around the base of the toilet.
- The wax ring that seals the toilet to the drain may be faulty. This is sometimes caused by a toilet that is loose, or it can be the result of a wax ring that has grown old and is no longer pliable enough to provide a good seal.
- Water condensing on the toilet might be dripping down and puddling around the base of the toilet. The water in the toilet tank and bowl is often quite cold, and the cool porcelain can cause humid room air to condense and drip down onto the floor. If this is the case, you can usually see droplets of water collecting on the outside of the porcelain bowl and tank.
Warning
Avoid using your leaking toilet if possible. The water seeping from your toilet is dirty and can cause unpleasant odors and potential health hazards. The presence of standing water near your toilet can also damage your flooring and subflooring as well as your first-floor ceiling if your affected bathroom is on the second story.
How to Install a Toilet on an Unlevel Floor
Few toilets are installed on a floor so unlevel that you have a good chance of falling off the side before you finish your business. However, even a small tilt of the toilet on an uneven floor can cause problems. Replacing a toilet requires no plumbing skills or special tools, and can be done in under two hours.
- Turn the water valve to “off” next to the wall and flush the toilet to drain it of water. Disconnect the water pipe from the unit. Wedge the screwdriver under the plastic caps along the base and pop them off, giving you access to the nuts holding the toilet to the floor bolts. Remove the nuts from the bolts with the wrench.
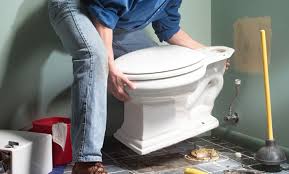
- Rock the bowl gently side to side, and the lift the toilet off the bolts. Lay it on its side on the towels. Water will come out of the unit after you do this.
- Stuff a towel down into the sewer pipe to avoid sewer gas from coming back into the room. Clean off the old wax ring with the putty knife, making sure to remove all of it from the flange. Set the new wax ring into place, and remove the towel.
- Lower the toilet into place over the bolts and onto the wax ring. It is important that the toilet be seated properly at this point as the wax ring can easily crack. If this happens the toilet will leak at the floor base. Do not wiggle the toilet or rock it from side to side after it is down. Sit on the toilet stool to seat it firmly against the wax ring. Add the nuts back to the bolts and screw them on about half way.
- Place the carpenters level across the toilet bowl side to side and note where the bubble level is. Hammer a shim gently between the floor and the toilet base to bring a low side up. Continue to check the level in several directions around the toilet bowl and add more shims as necessary to level the bowl. When the bubble is level in all directions then tighten the bolts down firmly. Do not over-tighten as this may crack the toilet porcelain. Check the level a final time to be sure that it has remained the same.
- Saw off any protruding shims around the base of the toilet with a keyhole or other small saw that will fit into the space. Some shims come with perforated lines across the plastic so you can merely snap off any excessive shim with your fingers. Fill any gaps between the floor and the toilet base with caulk. You can also cover the shims with the caulk to hide them from view. Add the new bolt caps back to the base bolts.
Should You Remove the Toilet When Tiling the Bathroom Floor?
Many homeowners often try to cut a few corners when attempting a bathroom remodel themselves. They often ask if they should remove the toilet before installing a new bathroom floor. While it is possible to install a new linoleum or ceramic tile floor without removing the toilet, it is not recommended and actually can increase the labor involved in the project. The following post will outline the reasons you should never install new flooring around an existing toilet.
Appearance
Bathroom remodeling can be expensive, even if you are doing it yourself. It just doesn’t make much sense to cut corners and wind up with a half-baked project when your hard-earned money is on the line. Tiling around a toilet to save a few dollars in labor will leave you with an unprofessional installation, and your guests will notice. It is almost impossible to cut flooring, especially ceramic tile or wood, precise enough to fit snugly around a toilet base. The finished product usually results in an uneven and thick joint around the toilet base, a joint that will require additional caulk or grout to conceal.
Difficulty
Removing the toilet before floor replacement can be quite difficult. Whether you hire your plumbing contractor to remove the toilet, or simply do it yourself, your flooring project will be much easier. Toilet bases are often oddly shaped, with many curves and rounded corners. Cutting flooring around these obstacles is difficult even for the most seasoned flooring installer. With the toilet removed, you can carry the tile all the way up to and around the toilet flange. When the toilet is reinstalled, its base will rest squarely on the new floor and cover any edges around the flange, leaving your project with a professional appearance.
Future Problems
In addition, if you fail to remove the toilet before new floor installation, you set yourself up for future problems if you must replace or remove the toilet down the road. Toilets are manufactured with a wide range of toilet base footprints and the chances of finding a new toilet with the exact footprint are slim to none. This could lead to flooring replacement or a shoddy toilet installation if your existing toilet ever fails.
How to Install a New Toilet on a Toilet Flange
Always place the wax ring on the closet flange. This helps eliminate the possibility of the ring falling off the bottom of the toilet bowl. Before you buy a new toilet, get the rough-in measurement.
Why does this matter?
First, the rough-in is the distance between the closet flange bolts and finished wall. In our case that distances was 12″. That’s why you see the closet flange bolts positioned at that 12″ mark. We secured them to the closet flange using nuts and washers. Once the wax ring and closet flange bolts are in place, the toilet can be lowered onto the closet flange.
Align the holes in the toilet with the closet flange bolts and slowly lower it until the bowl meets the wax ring. Then compress the toilet against the wax ring to make a good watertight seal. Add the plastic washers first, then metal washers, and finally the nuts to the closet flange bolts.